

JUnit5学习之八:综合进阶(终篇)
发布于2021-03-10 18:23 阅读(1361) 评论(0) 点赞(8) 收藏(0)
欢迎访问我的GitHub
https://github.com/zq2599/blog_demos
内容:所有原创文章分类汇总及配套源码,涉及Java、Docker、Kubernetes、DevOPS等;
关于《JUnit5学习》系列
《JUnit5学习》系列旨在通过实战提升SpringBoot环境下的单元测试技能,一共八篇文章,链接如下:
- 基本操作
- Assumptions类
- Assertions类
- 按条件执行
- 标签(Tag)和自定义注解
- 参数化测试(Parameterized Tests)基础
- 参数化测试(Parameterized Tests)进阶
- 综合进阶(终篇)
本篇概览
- 本文是《JUnit5学习》系列的终篇,将JUnit5提供的一些高级特性以实战的形式展现出来;
- JUnit5的特性非常多,《JUnit5学习》系列也只是将常用部分写出来,未能覆盖全部;
- 本文由以下章节组成:
- 版本设置
- 测试方法展现名称生成器
- 重复测试
- 嵌套
- 动态测试(Dynamic Tests)
- 多线程并发执行测试方法
源码下载
- 如果您不想编码,可以在GitHub下载所有源码,地址和链接信息如下表所示:
| 名称 | 链接 | 备注 |
|---|---|---|
| 项目主页 | https://github.com/zq2599/blog_demos | 该项目在GitHub上的主页 |
| git仓库地址(https) | https://github.com/zq2599/blog_demos.git | 该项目源码的仓库地址,https协议 |
| git仓库地址(ssh) | git@github.com:zq2599/blog_demos.git | 该项目源码的仓库地址,ssh协议 |
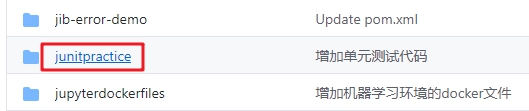
- 这个git项目中有多个文件夹,本章的应用在junitpractice文件夹下,如下图红框所示:
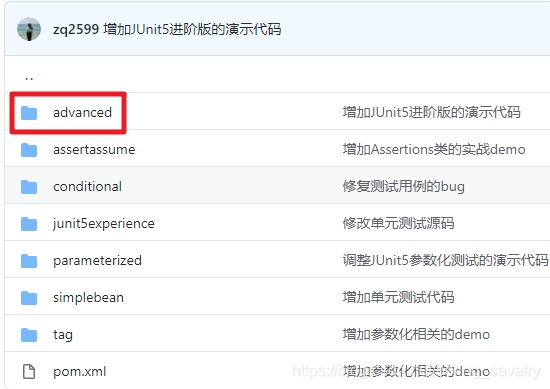
- junitpractice是父子结构的工程,本篇的代码在advanced子工程中,如下图:
版本设置
- 《JUnit5学习》系列的代码都在用SpringBoot:2.3.4.RELEASE框架,间接依赖的JUnit版本是5.6.2;
- 本文有两个特性要求JUnit版本达到5.7或者更高,它们是测试方法展现名称生成器和动态生成测试方法;
- 对于使用SpringBoot:2.3.4.RELEASE框架的工程,如果要指定JUnit版本,需要做以下三步操作:
- dependencyManagement节点添加junit-bom,并指定版本号:
<dependencyManagement>
  <dependencies>
    <dependency>
      <groupId>org.junit</groupId>
      <artifactId>junit-bom</artifactId>
      <version>5.7.0</version>
      <type>pom</type>
      <scope>import</scope>
    </dependency>
  </dependencies>
</dependencyManagement>
- 排除spring-boot-starter-test和junit-jupiter的间接依赖关系:
<dependency>
  <groupId>org.springframework.boot</groupId>
  <artifactId>spring-boot-starter-test</artifactId>
  <scope>test</scope>
  <exclusions>
    <exclusion>
      <groupId>org.junit.jupiter</groupId>
      <artifactId>junit-jupiter</artifactId>
    </exclusion>
  </exclusions>
</dependency>
- 添加junit-jupiter依赖,此时会使用dependencyManagement中指定的版本号:
<dependency>
  <groupId>org.junit.jupiter</groupId>
  <artifactId>junit-jupiter</artifactId>
  <scope>test</scope>
</dependency>
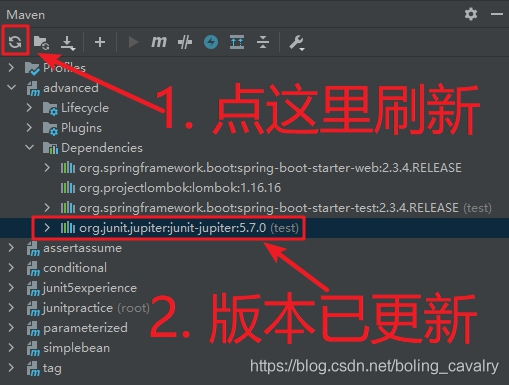
- 如下图,刷新可见已经用上了5.7.0版本:
- 版本问题解决了,接下来正式进入进阶实战;
测试方法展现名称生成器(Display Name Generators)
- 把Display Name Generators翻译成测试方法展现名称生成器,可能刷新了读者们对本文作者英文水平的认知,请您多包含...
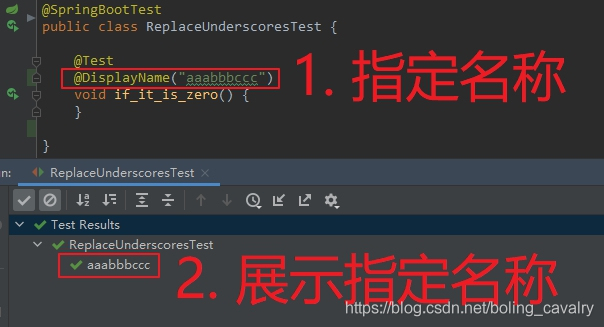
- 先回顾一下如何指定测试方法的展现名称,如果测试方法使用了@DisplayName,在展示单元测试执行结果时,就会显示@DisplayName指定的字符串,如下图所示:
3. 除了用@DisplayName指定展示名称,JUnit5还提供了一种自动生成展示名称的功能:@DisplayNameGeneration,来看看它是如何生成展示名称的;
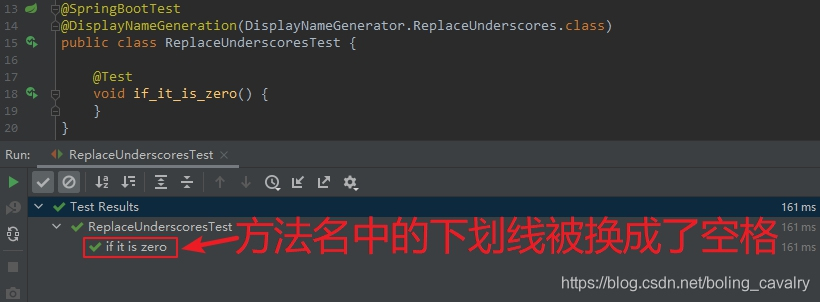
4. 演示代码如下所示,当@DisplayNameGeneration的value设置为ReplaceUnderscores时,会把方法名的所有下划线替换为空格:
package com.bolingcavalry.advanced.service.impl;

import org.junit.jupiter.api.DisplayNameGeneration;
import org.junit.jupiter.api.DisplayNameGenerator;
import org.junit.jupiter.api.Test;
import org.springframework.boot.test.context.SpringBootTest;

@SpringBootTest
@DisplayNameGeneration(DisplayNameGenerator.ReplaceUnderscores.class)
public class ReplaceUnderscoresTest {

    @Test
    void if_it_is_zero() {
    }
}
- 执行结果如下图,方法if_it_is_zero展示出的名字为if it is zero:
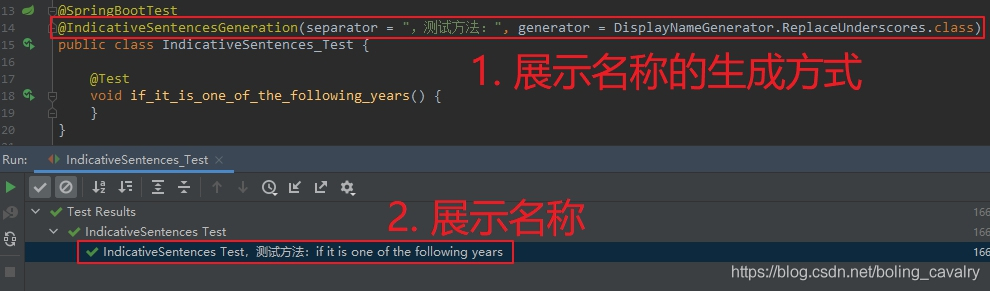
6. 在上述替换方式的基础上,JUnit5还提供了另一种生成展示名称的方法:测试类名+连接符+测试方法名,并且类名和方法名的下划线都会被替换成空格,演示代码如下,使用了注解@IndicativeSentencesGeneration,其separator属性就是类名和方法名之间的连接符:
package com.bolingcavalry.advanced.service.impl;

import org.junit.jupiter.api.DisplayNameGenerator;
import org.junit.jupiter.api.IndicativeSentencesGeneration;
import org.junit.jupiter.api.Test;
import org.springframework.boot.test.context.SpringBootTest;

@SpringBootTest
@IndicativeSentencesGeneration(separator = ",测试方法:", generator = DisplayNameGenerator.ReplaceUnderscores.class)
public class IndicativeSentences_Test {

    @Test
    void if_it_is_one_of_the_following_years() {
    }
}
- 执行结果如下:
重复测试(Repeated Tests)
- 重复测试就是指定某个测试方法反复执行多次,演示代码如下,可见@Test已被@RepeatedTest(5)取代,数字5表示重复执行5次:
    @Order(1)
    @DisplayName("重复测试")
    @RepeatedTest(5)
    void repeatTest(TestInfo testInfo) {
        log.info("测试方法 [{}]", testInfo.getTestMethod().get().getName());
    }
- 执行结果如下图:

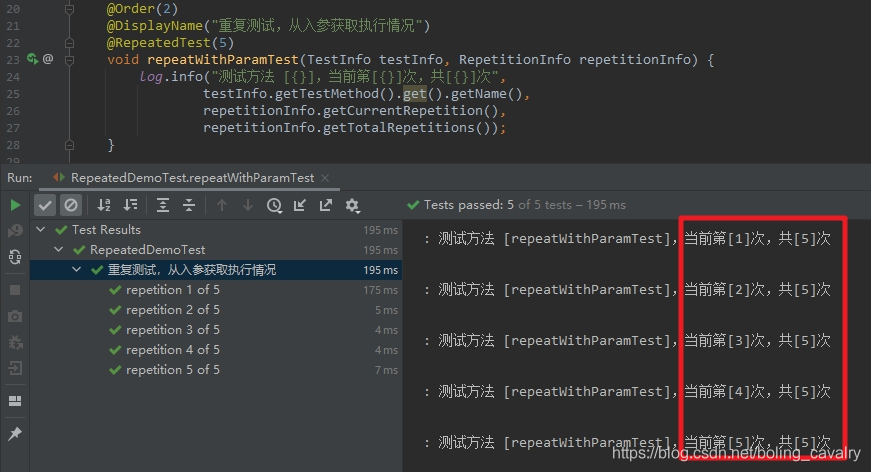
3. 在测试方法执行时,如果想了解当前是第几次执行,以及总共有多少次,只要给测试方法增加RepetitionInfo类型的入参即可,演示代码如下,可见RepetitionInfo提供的API可以得到总数和当前次数:
    @Order(2)
    @DisplayName("重复测试,从入参获取执行情况")
    @RepeatedTest(5)
    void repeatWithParamTest(TestInfo testInfo, RepetitionInfo repetitionInfo) {
        log.info("测试方法 [{}],当前第[{}]次,共[{}]次",
                testInfo.getTestMethod().get().getName(),
                repetitionInfo.getCurrentRepetition(),
                repetitionInfo.getTotalRepetitions());
    }
- 上述代码执行结果如下:
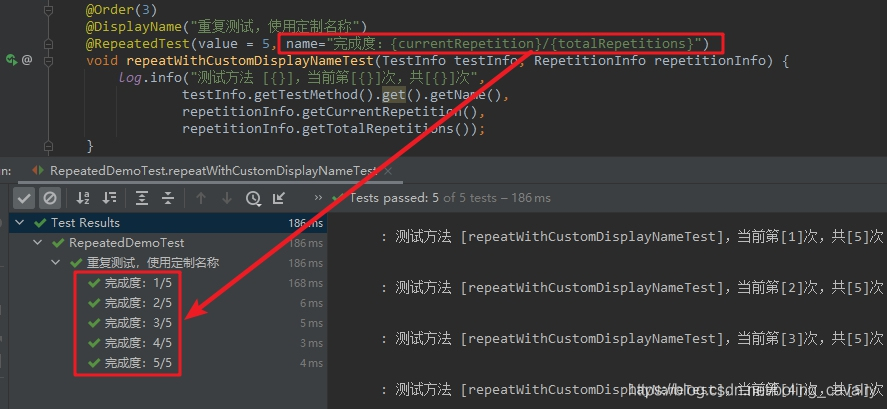
5. 在上图的左下角可见,重复执行的结果被展示为"repetition X of X"这样的内容,其实这部分信息是可以定制的,就是RepeatedTest注解的name属性,演示代码如下,可见currentRepetition和totalRepetitions是占位符,在真正展示的时候会被分别替换成当前值和总次数:
    @Order(3)
    @DisplayName("重复测试,使用定制名称")
    @RepeatedTest(value = 5, name="完成度:{currentRepetition}/{totalRepetitions}")
    void repeatWithCustomDisplayNameTest(TestInfo testInfo, RepetitionInfo repetitionInfo) {
        log.info("测试方法 [{}],当前第[{}]次,共[{}]次",
                testInfo.getTestMethod().get().getName(),
                repetitionInfo.getCurrentRepetition(),
                repetitionInfo.getTotalRepetitions());
    }
- 上述代码执行结果如下:
嵌套测试(Nested Tests)
- 如果一个测试类中有很多测试方法(如增删改查,每种操作都有多个测试方法),那么不论是管理还是结果展现都会显得比较复杂,此时嵌套测试(Nested Tests)就派上用场了;
- 嵌套测试(Nested Tests)功能就是在测试类中创建一些内部类,以增删改查为例,将所有测试查找的方法放入一个内部类,将所有测试删除的方法放入另一个内部类,再给每个内部类增加@Nested注解,这样就会以内部类为单位执行测试和展现结果,如下图所示:
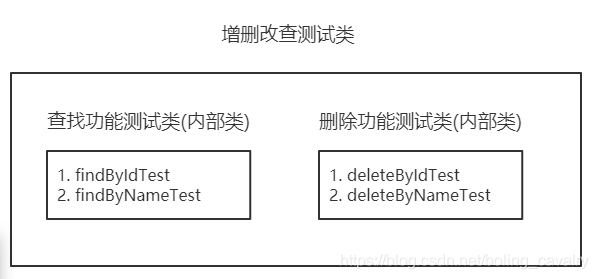
3. 嵌套测试的演示代码如下:
package com.bolingcavalry.advanced.service.impl;

import lombok.extern.slf4j.Slf4j;
import org.junit.jupiter.api.DisplayName;
import org.junit.jupiter.api.Nested;
import org.junit.jupiter.api.Test;
import org.springframework.boot.test.context.SpringBootTest;

@SpringBootTest
@Slf4j
@DisplayName("嵌套测试演示")
public class NestedTest {

    @Nested
    @DisplayName("查找服务相关的测试")
    class FindService {
        @Test
        void findByIdTest() {}
        @Test
        void findByNameTest() {}
    }

    @Nested
    @DisplayName("删除服务相关的测试")
    class DeleteService {
        @Test
        void deleteByIdTest() {}
        @Test
        void deleteByNameTest() {}
    }
}
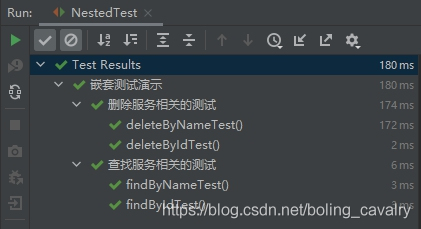
- 上述代码执行结果如下,可见从代码管理再到执行和结果展示,都被分组管理了:
动态测试(Dynamic Tests)
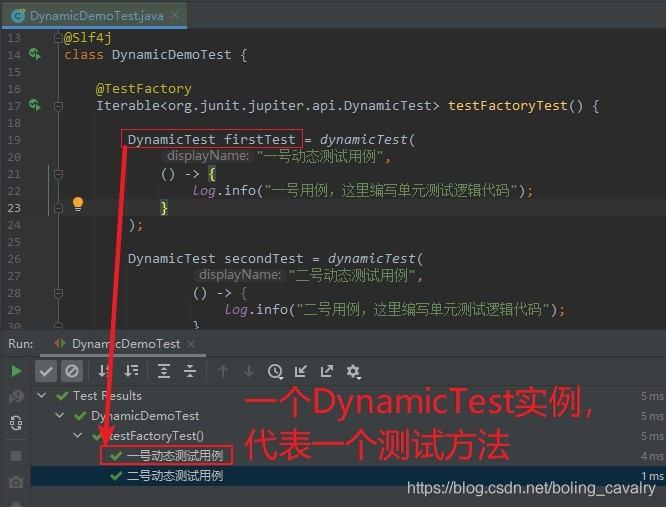
- 之前咱们写的测试方法,主要是用@Test修饰,这些方法的特点就是在编译阶段就已经明确了,在运行阶段也已经固定;
- JUnit5推出了另一种类型的测试方法:动态测试(Dynamic Tests),首先,测试方法是可以在运行期间被生产出来的,生产它们的地方,就是被@TestFactory修饰的方法,等到测试方法被生产出来后再像传统的测试方法那样被执行和结果展示;
- 下面是演示代码,testFactoryTest方法被@TestFactory修饰,返回值是Iterable类型,里面是多个DynamicTest实例,每个DynamicTest实例代表一个测试方法,因此,整个DynamicDemoTest类中有多少个测试方法,在编译阶段是不能确定的,只有在运行阶段执行了testFactoryTest方法后,才能根据返回值确定下来:
package com.bolingcavalry.advanced.service.impl;

import lombok.extern.slf4j.Slf4j;
import org.junit.jupiter.api.DynamicTest;
import org.junit.jupiter.api.TestFactory;
import org.springframework.boot.test.context.SpringBootTest;
import java.util.Arrays;
import static org.junit.jupiter.api.DynamicTest.dynamicTest;

@SpringBootTest
@Slf4j
class DynamicDemoTest {

    @TestFactory
    Iterable<org.junit.jupiter.api.DynamicTest> testFactoryTest() {

        DynamicTest firstTest = dynamicTest(
            "一号动态测试用例",
            () -> {
                log.info("一号用例,这里编写单元测试逻辑代码");
            }
        );

        DynamicTest secondTest = dynamicTest(
                "二号动态测试用例",
                () -> {
                    log.info("二号用例,这里编写单元测试逻辑代码");
                }
        );

        return Arrays.asList(firstTest, secondTest);
    }
}
- 上述代码的执行结果如下,可见每个DynamicTest实例就相当于以前的一个@Test修饰的方法,会被执行和统计:
多线程并发执行(Parallel Execution)的介绍
- 《JUnit5学习》系列的最后,咱们来看一个既容易理解又实用的特性:多线程并发执行(Parallel Execution)
- JUnit5中的并发执行测试可以分为以下三种场景:
- 多个测试类,它们各自的测试方法同时执行;
- 一个测试类,里面的多个测试方法同时执行;
- 一个测试类,里面的一个测试方法,在重复测试(Repeated Tests)或者参数化测试(Parameterized Tests)的时候,这个测试方法被多个线程同时执行;
多线程并发执行(Parallel Execution)实战
- 前面介绍了多线程并发执行有三种场景,文章篇幅所限就不逐个编码实战了,就选择第三种场景来实践吧,即:一个测试类里面的一个测试方法,在重复测试时多线程并发执行,至于其他两种场景如何设置,接下来的文中也会讲清楚,您自行实践即可;
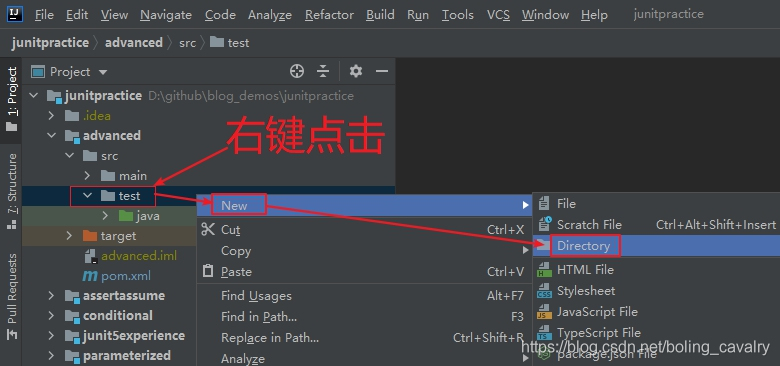
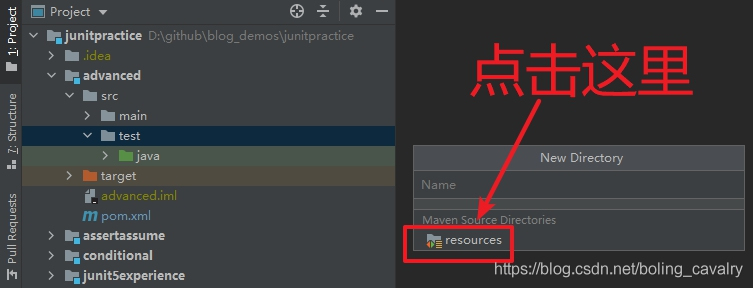
- 首先是创建JUnit5的配置文件,如下图,在test文件夹上点击鼠标右键,在弹出的菜单选择"New"->"Directory":
- 弹出的窗口如下图,双击红框位置的"resources",即可新建resources目录:
- 在新增的resources目录中新建文件junit-platform.properties,内容如下,每个配置项都有详细的说明:
# 并行开关true/false
junit.jupiter.execution.parallel.enabled=true
# 方法级多线程开关 same_thread/concurrent
junit.jupiter.execution.parallel.mode.default = same_thread
# 类级多线程开关 same_thread/concurrent
junit.jupiter.execution.parallel.mode.classes.default = same_thread

# 并发策略有以下三种可选:
# fixed:固定线程数,此时还要通过junit.jupiter.execution.parallel.config.fixed.parallelism指定线程数
# dynamic:表示根据处理器和核数计算线程数
# custom:自定义并发策略,通过这个配置来指定:junit.jupiter.execution.parallel.config.custom.class
junit.jupiter.execution.parallel.config.strategy = fixed

# 并发线程数,该配置项只有当并发策略为fixed的时候才有用
junit.jupiter.execution.parallel.config.fixed.parallelism = 5
- 由于实践的是同一个类同一个方法多次执行的并发,因此上述配置中,类级多线程开关和方法级多线程开关都选择了"同一个线程",也就是说不需要并发执行多个类或者多个方法,请您根据自己的需求自行调整;
- 关于并发策略,这里选择的是动态调整,我这里是i5-8400处理器,拥有六核心六线程,稍后咱们看看执行效果与这个硬件配置是否有关系;
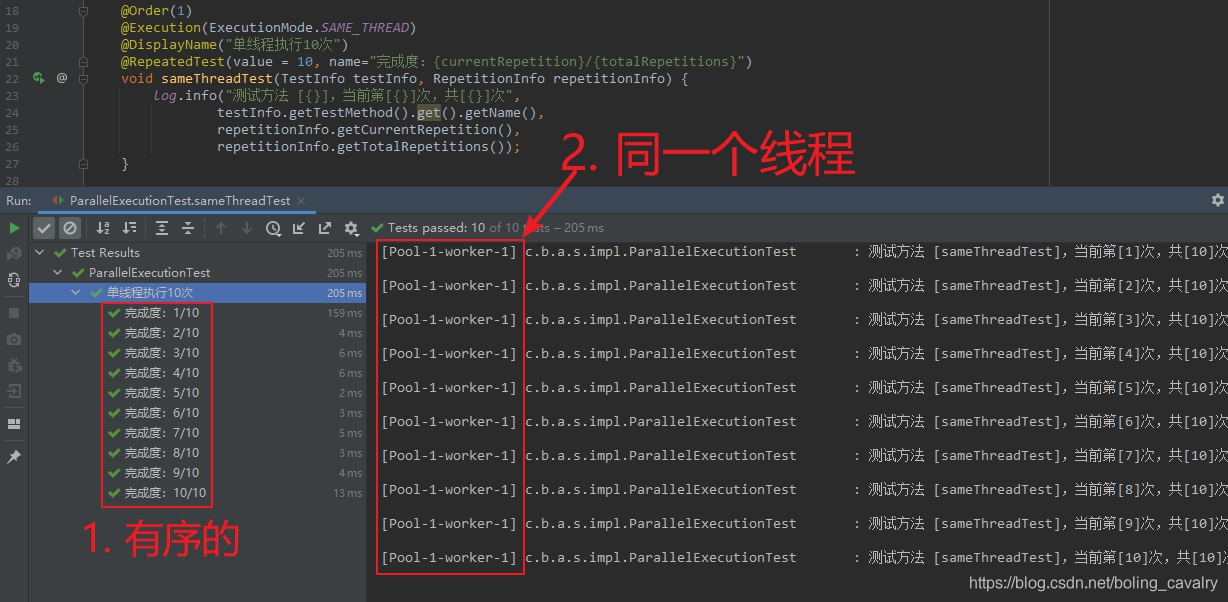
- 接下来编写测试代码,先写一个单线程执行的,可见@Execution的值为SAME_THREAD,限制了重复测试时在同一个线程内顺序执行:
package com.bolingcavalry.advanced.service.impl;

import lombok.extern.slf4j.Slf4j;
import org.junit.jupiter.api.*;
import org.junit.jupiter.api.parallel.Execution;
import org.junit.jupiter.api.parallel.ExecutionMode;
import org.junit.jupiter.params.ParameterizedTest;
import org.junit.jupiter.params.provider.ValueSource;
import org.springframework.boot.test.context.SpringBootTest;
import static org.junit.jupiter.api.Assertions.assertTrue;

@SpringBootTest
@Slf4j
@TestMethodOrder(MethodOrderer.OrderAnnotation.class)
class ParallelExecutionTest {

    @Order(1)
    @Execution(ExecutionMode.SAME_THREAD)
    @DisplayName("单线程执行10次")
    @RepeatedTest(value = 10, name="完成度:{currentRepetition}/{totalRepetitions}")
    void sameThreadTest(TestInfo testInfo, RepetitionInfo repetitionInfo) {
        log.info("测试方法 [{}],当前第[{}]次,共[{}]次",
                testInfo.getTestMethod().get().getName(),
                repetitionInfo.getCurrentRepetition(),
                repetitionInfo.getTotalRepetitions());
    }
}
- 执行结果如下,可见确实是单线程:
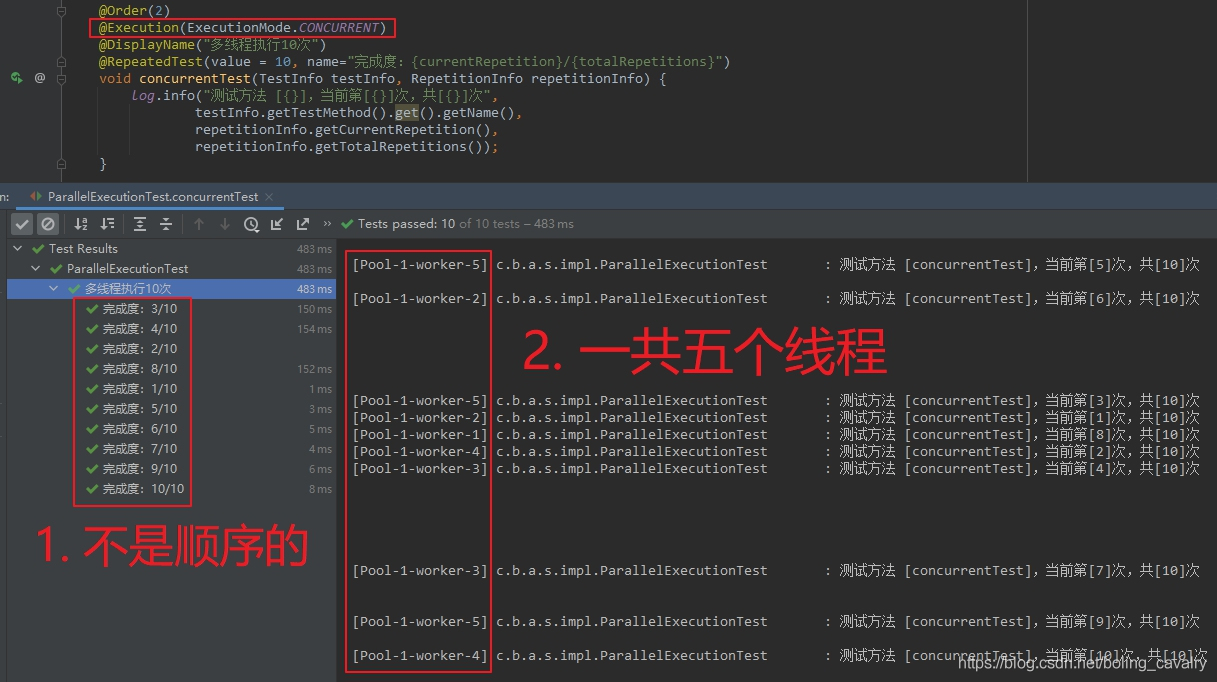
- 重复测试时并发执行的代码如下,@Execution的值为CONCURRENT:
    @Order(2)
    @Execution(ExecutionMode.CONCURRENT)
    @DisplayName("多线程执行10次")
    @RepeatedTest(value = 10, name="完成度:{currentRepetition}/{totalRepetitions}")
    void concurrentTest(TestInfo testInfo, RepetitionInfo repetitionInfo) {
        log.info("测试方法 [{}],当前第[{}]次,共[{}]次",
                testInfo.getTestMethod().get().getName(),
                repetitionInfo.getCurrentRepetition(),
                repetitionInfo.getTotalRepetitions());
    }
- 执行结果如下,从红框1可见顺序已经乱了,从红框2可见十次测试方法是在五个线程中执行的:
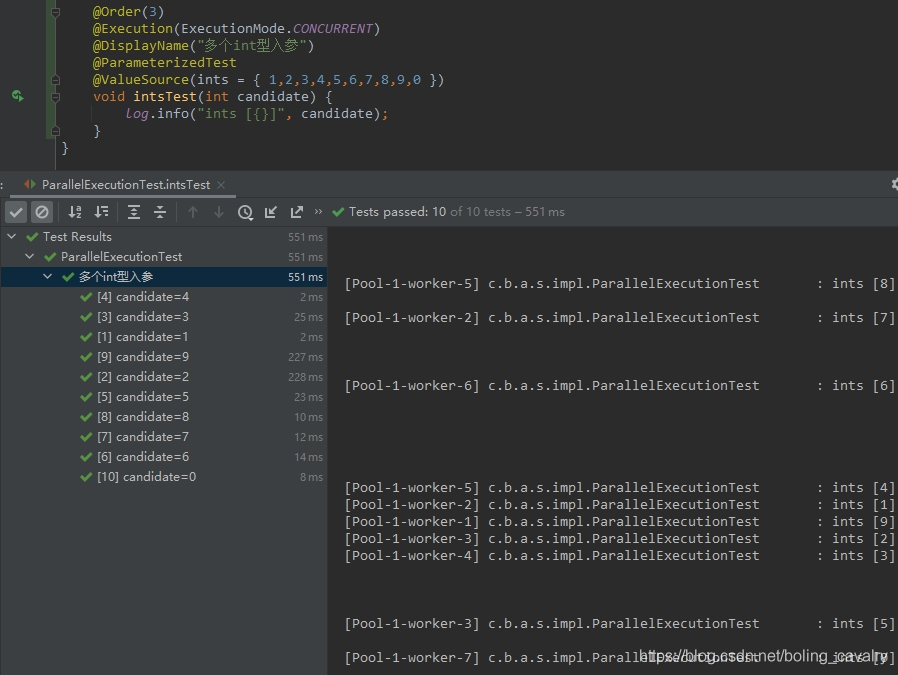
11. 最后是参数化测试的演示,也可以设置为多线程并行执行:
    @Order(3)
    @Execution(ExecutionMode.CONCURRENT)
    @DisplayName("多个int型入参")
    @ParameterizedTest
    @ValueSource(ints = { 1,2,3,4,5,6,7,8,9,0 })
    void intsTest(int candidate) {
        log.info("ints [{}]", candidate);
    }
- 执行结果如下图,可见也是5个线程并行执行的:
结束语
至此,《JUnit5学习》系列已经全部完成,感谢您的耐心阅读,希望这个原创系列能够带给您一些有用的信息,为您的单元测试提供一些参考,如果发现文章有错误,期待您能指点一二;
你不孤单,欣宸原创一路相伴
欢迎关注公众号:程序员欣宸
微信搜索「程序员欣宸」,我是欣宸,期待与您一同畅游Java世界...
https://github.com/zq2599/blog_demos
所属网站分类: 技术文章 > 博客
作者:Djdj
链接:http://www.javaheidong.com/blog/article/112309/893827093949aa70399a/
来源:java黑洞网
任何形式的转载都请注明出处,如有侵权 一经发现 必将追究其法律责任
昵称:
评论内容:(最多支持255个字符)
---无人问津也好,技不如人也罢,你都要试着安静下来,去做自己该做的事,而不是让内心的烦躁、焦虑,坏掉你本来就不多的热情和定力