07-SpringBoot核心功能之原理解析
发布于2021-05-29 19:52 阅读(630) 评论(0) 点赞(12) 收藏(1)
提前预知
- 课程笔记来源于雷神的SpringBoot2教程
- 参考文档地址:参考文档
- 要学会查看官方文档!!!!!!!!!
01、Profile功能
为了方便多环境适配,springboot简化了profile功能。
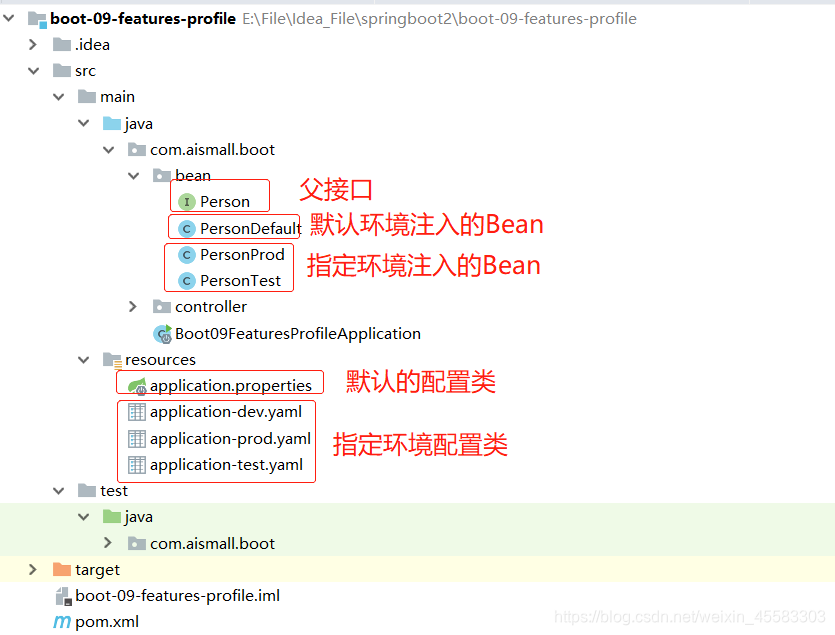
1.1、application-profile功能
-
默认配置文件
application.yaml,任何时候都会加载 -
指定环境配置文件 application-{环境名称}.yaml,例如:
- 开发环境配置文件:
application-dev.yaml - 生产环境配置文件:
application-prod.yaml - 测试环境配置文件:
application-test.yaml
- 开发环境配置文件:
-
环境配置文件只有激活指定环境才会生效
-
配置文件激活方式
- 方式一:在
默认配置文件中选择激活那个环境配置文件 ,如下:
spring.profiles.active=prod# 指定激活环境和默认环境配置文件都会生效- 方式二:命令行激活方式,如下:
java -jar xxx.jar --spring.profiles.active=prod - 方式一:在
-
注意:
- 修改配置文件中的任意值,命令行方式优先级别更高
- properties配置文件优先级高于yaml配置文件,我们可以选用这个配置文件作为默认环境的配置文件。
- 如果在默认激活环境中
没有激活指定配置环境,则默认配置环境要提供配置所需的一切功能,例如:封装值的Bean - 可以在默认配置环境中配置多个配置文件,它们一起生效
- 如果多个配置文件中配置了
重复的属性,默认是依次覆盖,也就是会使用最后一个配置文件中的配置。
1.2、@Profile注解

@Profile条件装配功能:
- 这个注解可以作用在类上,也可以作用在方法上,用来进行条件装配
- 在配置文件中激活什么样的环境,什么样的环境配置生效
- 父类接口
public interface Person {
   String getName();
   Integer getAge();
}
- Controller:
@RestController
public class HelloController {
    @Value("${person.name:李四}")
    private String name;

    @Autowired
    private Person person;

    @GetMapping("/")
    public String hello(){
        return person.getClass().toString();
    }

    @GetMapping("/person")
    public Person person(){
        return person;
    }
}
//在配置文件中激活prod环境这个类才会生效
@Profile("prod")
@Component
@ConfigurationProperties("person")
@Data
public class PersonProd{
    private String name;
    private Integer age;
}
//在配置文件中激活test环境这个类才会生效
@Profile("test")
@Component
@ConfigurationProperties("person")
@Data
public class PersonTest{
    private String name;
    private Integer age;
}
- 默认环境配置(default),激活指定环境(
prod)
server.port=8080
spring.profiles.active=prod
- prod环境配置
person:
  name: AISMALL-Prod
  age: 20
server:
  port: 8000
- 此时启动端口号为8000:
http://localhost:8000/person
返回结果:
{"name":"AISMALL-Prod","age":20}
1.3、profile分组
- 使用分组可以
同时加载多个配置文件,如果出现重复配置,配置依次覆盖
pring.profiles.active=myprod
# myprod分组
spring.profiles.group.myprod[0]=prod
spring.profiles.group.myprod[1]=dev
# test分组
spring.profiles.group.mytest[0]=test
02、外部化配置
其实就是配置文件
我们一般不愿意在类中将属性的值写死,这样不利于修改,所有我们采用配置文件给属性赋值的方式,就是外部化配置
2.1、外部配置源
可以采用哪些文件作为外部化配置文件:
- Java属性文件:
properties文件 YAML文件- 环境变量
- 命令行参数
2.2、配置文件查找位置
- (1) classpath 根路径
- (2) classpath 根路径下config目录
- (3) jar包当前目录
- (4) jar包当前目录的config目录
- (5) /config子目录的直接子目录
2.3、配置文件加载顺序:
- 1、当前jar包内部的application.properties和application.yml
- 2、当前jar包内部的application-{profile}.properties 和 application-{profile}.yml
- 3、引用的外部jar包的application.properties和application.yml
- 4、引用的外部jar包的application-{profile}.properties 和 application-{profile}.yml
2.4、配置文件生效方式
- 指定环境优先,外部优先,后面的可以覆盖前的
03、自定义starter(了解)
为什么要自定义starter,其实就是为了方便,换句话说就是懒,当官放给我提供的场景启动器不能满足我们的要求,我们还需要导入额外的依赖包,就可以通过自定义的场景启动器一次性导入进来。
3.1、starter启动原理
可以参考官方提供的启动器为例,找个简单点的启动器把:spring-boot-starter-test
- 导入场景启动器:
<dependency>
   <groupId>org.springframework.boot</groupId>
   <artifactId>spring-boot-starter-test</artifactId>
   <scope>test</scope>
</dependency>
- 查看发现场景启动器引入这么多的包:

- 在pom文件中进入这个场景启动器发现,有一个依赖包是
自动配置的包:
<dependency>
  <groupId>org.springframework.boot</groupId>
  <artifactId>spring-boot-test-autoconfigure</artifactId>
  <version>2.4.0</version>
  <scope>compile</scope>
</dependency>
- 找到了,自动配置的类都在这里

- 也就是starter的pom文件中引入了自动配置相关的包
- 这些自动配置的包如何生效:
autoconfigure包中:配置
META-INF/spring.factories中的EnableAutoConfiguration的值:org.springframework.boot.autoconfigure.EnableAutoConfiguration=\com.aismall.hello.auto.HelloServiceAutoConfiguration
当我们引入这个场景启动器后,使得项目启动加载指定的自动配置类
- 自动配置类如何实现自动配置的
编写自动配置类 xxxAutoConfiguration -> xxxxProperties
总体步骤:
引入starter --- xxxAutoConfiguration --- 容器中放入组件 ---- 绑定xxxProperties ---- 配置项
3.2、自定义starter
我们定义一个启动器,引入场景后可以给人打招呼

参考上面的步骤:
- 第一步:创建一个空的
maven工程作为父工程 - 第二步:在父工程中创建一个Module作为starter(
Maven工程即可):hello-spring-boot-starter - 第三步:在父工程中创建一个Module作为自动配置包(
SpringBoot工程):hello-spring-boot-starter-autoconfigure - 第四步:在starter的pom文件中引入自动配置包:
<dependencies>
   <dependency>
       <groupId>com.aismall</groupId>
       <artifactId>hello-spring-boot-starter-autoconfigure</artifactId>
       <version>0.0.1-SNAPSHOT</version>
   </dependency>
</dependencies>
- 第五步:编写自动配置包
@Configuration
//默认HelloProperties放在容器中
@EnableConfigurationProperties(HelloProperties.class)
public class HelloServiceAutoConfiguration{
	//当容器中没有这个bean才注入
    @ConditionalOnMissingBean(HelloService.class)
    @Bean
    public HelloService helloService(){
        HelloService helloService = new HelloService();
        return helloService;
    }
}
//配置类绑定
@ConfigurationProperties("aismall.hello")
public class HelloProperties {

    private String prefix;
    private String suffix;

    public String getPrefix() {
        return prefix;
    }

    public void setPrefix(String prefix) {
        this.prefix = prefix;
    }

    public String getSuffix() {
        return suffix;
    }

    public void setSuffix(String suffix) {
        this.suffix = suffix;
    }
}
//当容器中没有这个bean才会将这个bean注入
public class HelloService {
    @Autowired
    HelloProperties helloProperties;
    public String sayHello(String userName){
        return helloProperties.getPrefix() + ":"+userName+"》"+helloProperties.getSuffix();
    }
}
org.springframework.boot.autoconfigure.EnableAutoConfiguration=\
com.aismall.hello.auto.HelloServiceAutoConfiguration
- 第六步:打包这上面的两个Module,先打包自动配置包,然后将它们放入放入到我们的maven仓库中
- 最后一步:新建一个SpringBoot项目,然后引入自定义的starter,就可以使用了。


04、SpringBoot原理(了解)
SpringBoot不是一个单纯的框架,它更相当于一个boot(启动项),SpringBoot内部整合了许多框架,例如:
- Spring框架
- SpringMVC框架
如果想很好的理解SpringBoot,这些技术也需要理解:
- Spring原理、SpringMVC原理、自动配置原理、SpringBoot原理
4.1、SpringBoot启动过程
断点打在启动类,进行Debug:
-
创建
SpringApplication- 保存一些信息
- 判定当前应用的类型。ClassUtils。Servlet
- bootstrappers:
初始启动引导器(List<Bootstrapper>):去spring.factories文件中找Bootstrapper。 - 找 ApplicationContextInitializer,
应用上下文初始化器,去spring.factories找 ApplicationContextInitializer- List<ApplicationContextInitializer<?>> initializers
- 找 ApplicationListener ,
应用监听器,去spring.factories找 ApplicationListener- List<ApplicationListener<?>> listeners
-
运行
SpringApplication- StopWatch
- 记录应用的启动时间
创建引导上下文(Context环境)createBootstrapContext()- 获取到所有之前的 bootstrappers 挨个执行 intitialize() 来完成对引导启动器上下文环境设置
- 让当前应用进入headless模式。java.awt.headless
- 获取所有
RunListener,运行监听器,为了方便所有Listener进行事件感知- getSpringFactoriesInstances 去spring.factories找 SpringApplicationRunListener.
- 遍历 SpringApplicationRunListener 调用 starting 方法;
- 相当于通知所有感兴趣系统正在启动过程的人,项目正在 starting。
- 保存命令行参数;ApplicationArguments
- 准备环境 prepareEnvironment();
- 返回或者创建基础环境信息对象。StandardServletEnvironment
- 配置环境信息对象。
- 读取所有的配置源的配置属性值。
- 绑定环境信息
- 监听器调用 listener.environmentPrepared();通知所有的监听器当前环境准备完成
- 创建IOC容器(createApplicationContext())
- 根据项目类型(Servlet)创建容器,
- 当前会创建 AnnotationConfigServletWebServerApplicationContext
- 准备ApplicationContext IOC容器的基本信息 prepareContext()
- 保存环境信息
- IOC容器的后置处理流程。
- 应用初始化器;applyInitializers;
- 遍历所有的 ApplicationContextInitializer 。调用 initialize.。来对ioc容器进行初始化扩展功能
- 遍历所有的 listener 调用 contextPrepared。EventPublishRunListenr;通知所有的监听器contextPrepared
- 所有的监听器 调用 contextLoaded。通知所有的监听器 contextLoaded;
- 刷新IOC容器。refreshContext
- 创建容器中的所有组件(Spring注解)
- 容器刷新完成后工作?afterRefresh
- 所有监听 器 调用 listeners.started(context); 通知所有的监听器 started
- 调用所有runners;callRunners()
- 获取容器中的 ApplicationRunner
- 获取容器中的 CommandLineRunner
- 合并所有runner并且按照@Order进行排序
- 遍历所有的runner。调用 run 方法
- 如果以上有异常,
- 调用Listener 的 failed
- 调用所有监听器的 running 方法 listeners.running(context); 通知所有的监听器 running
- running如果有问题。继续通知 failed 。调用所有 Listener 的 failed;通知所有的监听器 failed
4.2、自定义事件和监听组件
- ApplicationContextInitializer
- ApplicationListener
- SpringApplicationRunListener
我们可以定义这些组件,自定义完之后在配置文件中配置它们即可,这个三个组件的配置位置:resources/META-INF/spring.factories
自定义组件:
- MyApplicationContextInitializer
public class MyApplicationContextInitializer implements ApplicationContextInitializer {
    @Override
    public void initialize(ConfigurableApplicationContext applicationContext) {
        System.out.println("MyApplicationContextInitializer ....initialize.... ");
    }
}
- MyApplicationListener
public class MyApplicationListener implements ApplicationListener {
    @Override
    public void onApplicationEvent(ApplicationEvent event) {
        System.out.println("MyApplicationListener.....onApplicationEvent...");
    }
}
- MySpringApplicationRunListener
public class MySpringApplicationRunListener implements SpringApplicationRunListener {

    private SpringApplication application;
    public MySpringApplicationRunListener(SpringApplication application, String[] args){
        this.application = application;
    }

    @Override
    public void starting(ConfigurableBootstrapContext bootstrapContext) {
        System.out.println("MySpringApplicationRunListener....starting....");

    }


    @Override
    public void environmentPrepared(ConfigurableBootstrapContext bootstrapContext, ConfigurableEnvironment environment) {
        System.out.println("MySpringApplicationRunListener....environmentPrepared....");
    }


    @Override
    public void contextPrepared(ConfigurableApplicationContext context) {
        System.out.println("MySpringApplicationRunListener....contextPrepared....");

    }

    @Override
    public void contextLoaded(ConfigurableApplicationContext context) {
        System.out.println("MySpringApplicationRunListener....contextLoaded....");
    }

    @Override
    public void started(ConfigurableApplicationContext context) {
        System.out.println("MySpringApplicationRunListener....started....");
    }

    @Override
    public void running(ConfigurableApplicationContext context) {
        System.out.println("MySpringApplicationRunListener....running....");
    }

    @Override
    public void failed(ConfigurableApplicationContext context, Throwable exception) {
        System.out.println("MySpringApplicationRunListener....failed....");
    }
}
- 配置自定义的这些组件
org.springframework.context.ApplicationContextInitializer=\
  com.aismall.boot.listener.MyApplicationContextInitializer

org.springframework.context.ApplicationListener=\
  com.aismall.boot.listener.MyApplicationListener

org.springframework.boot.SpringApplicationRunListener=\
  com.aismall.boot.listener.MySpringApplicationRunListener
4.3、ApplicationRunner 与 CommandLineRunner
自定义组件:
- MyCommandLineRunner
@Order(2)
@Component
public class MyCommandLineRunner implements CommandLineRunner {
    @Override
    public void run(String... args) throws Exception {
        System.out.println("MyCommandLineRunner....run....");
    }
}
- MyApplicationRunner
@Order(1)
@Component
public class MyApplicationRunner implements ApplicationRunner {
    @Override
    public void run(ApplicationArguments args) throws Exception {
        System.out.println("MyApplicationRunner...run...");
    }
}
05、后记
到此为止就结束了,不得不说SpringBoot的自动配置功能真的强大,源码分析部分有时间最好看看,跟着debug走一遍,知其然知其所以然才能运用自如,我还需要加强修炼。
记录一下:2021-5-27-15:50
原文链接:https://blog.csdn.net/weixin_45583303/article/details/117317339
所属网站分类: 技术文章 > 博客
作者:小泽圈儿郎
链接:http://www.javaheidong.com/blog/article/207242/8de9f56a75a2958eb9ee/
来源:java黑洞网
任何形式的转载都请注明出处,如有侵权 一经发现 必将追究其法律责任
昵称:
评论内容:(最多支持255个字符)
---无人问津也好,技不如人也罢,你都要试着安静下来,去做自己该做的事,而不是让内心的烦躁、焦虑,坏掉你本来就不多的热情和定力