系列学习分布式任务调度 XXL-JOB 之第 3 篇 —— SpringBoot 整合 XXL-JOB(完结)
发布于2021-05-29 21:28 阅读(1495) 评论(0) 点赞(4) 收藏(4)

之前我们使用 XXL-JOB 是使用官方自带的代码模块,我们可以自己将 XXL-JOB 的核心代码整理出来,整合到我们的实际项目中。
比如官网自带的 SpringBoot 项目的 pom.xml 配置,使用的 parent 如图所示,我们在自己的公司里,有自己的 parent 依赖,因此我们需要把核心的依赖提取出来。

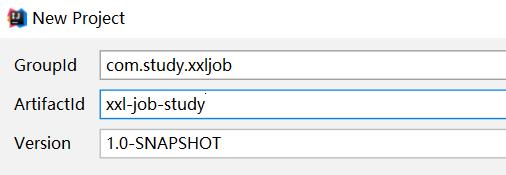
我们先创建一个项目:

修改 pom.xml 配置
①我们把 XXL-JOB 的 SpringBoot 除 parent 节点以外的内容拷贝过来。即 dependencyManagement 节点和 build 节点。
②找到 XXL-JOB 的 SpringBoot 最外层的 pom.xml 的 parent,点击进入,把 <properties> 节点的内容拷贝过来。

③最后缺少 xxl-job-core 核心包,如图:

我们可以把它的核心包安装到我们本地 Maven 仓库,也可以写固定。比如我使用的版本号是 2.3.0

完整的 pom.xml 配置如下:
- <?xml version="1.0" encoding="UTF-8"?>
- <project xmlns="http://maven.apache.org/POM/4.0.0"
- xmlns:xsi="http://www.w3.org/2001/XMLSchema-instance"
- xsi:schemaLocation="http://maven.apache.org/POM/4.0.0 http://maven.apache.org/xsd/maven-4.0.0.xsd">
- <modelVersion>4.0.0</modelVersion>
-
- <groupId>com.study.xxljob</groupId>
- <artifactId>xxl-job-study</artifactId>
- <version>1.0-SNAPSHOT</version>
-
- <properties>
- <project.build.sourceEncoding>UTF-8</project.build.sourceEncoding>
- <project.reporting.outputEncoding>UTF-8</project.reporting.outputEncoding>
- <maven.compiler.encoding>UTF-8</maven.compiler.encoding>
- <maven.compiler.source>1.8</maven.compiler.source>
- <maven.compiler.target>1.8</maven.compiler.target>
- <maven.test.skip>true</maven.test.skip>
-
- <netty-all.version>4.1.58.Final</netty-all.version>
- <gson.version>2.8.6</gson.version>
-
- <spring.version>5.3.3</spring.version>
- <spring-boot.version>2.4.2</spring-boot.version>
-
- <mybatis-spring-boot-starter.version>2.1.4</mybatis-spring-boot-starter.version>
- <mysql-connector-java.version>8.0.23</mysql-connector-java.version>
-
- <slf4j-api.version>1.7.30</slf4j-api.version>
- <junit.version>5.7.1</junit.version>
- <javax.annotation-api.version>1.3.2</javax.annotation-api.version>
-
- <groovy.version>3.0.7</groovy.version>
-
- <maven-source-plugin.version>3.2.1</maven-source-plugin.version>
- <maven-javadoc-plugin.version>3.2.0</maven-javadoc-plugin.version>
- <maven-gpg-plugin.version>1.6</maven-gpg-plugin.version>
- <maven-war-plugin.version>3.3.1</maven-war-plugin.version>
- </properties>
-
- <dependencyManagement>
- <dependencies>
- <dependency>
- <!-- Import dependency management from Spring Boot (依赖管理:继承一些默认的依赖,工程需要依赖的jar包的管理,申明其他dependency的时候就不需要version) -->
- <groupId>org.springframework.boot</groupId>
- <artifactId>spring-boot-starter-parent</artifactId>
- <version>${spring-boot.version}</version>
- <type>pom</type>
- <scope>import</scope>
- </dependency>
- </dependencies>
- </dependencyManagement>
-
- <dependencies>
- <!-- spring-boot-starter-web (spring-webmvc + tomcat) -->
- <dependency>
- <groupId>org.springframework.boot</groupId>
- <artifactId>spring-boot-starter-web</artifactId>
- </dependency>
- <dependency>
- <groupId>org.springframework.boot</groupId>
- <artifactId>spring-boot-starter-test</artifactId>
- <scope>test</scope>
- </dependency>
-
- <!-- xxl-job-core -->
- <dependency>
- <groupId>com.xuxueli</groupId>
- <artifactId>xxl-job-core</artifactId>
- <version>2.3.0</version>
- </dependency>
-
- </dependencies>
-
- <build>
- <plugins>
- <!-- spring-boot-maven-plugin (提供了直接运行项目的插件:如果是通过parent方式继承spring-boot-starter-parent则不用此插件) -->
- <plugin>
- <groupId>org.springframework.boot</groupId>
- <artifactId>spring-boot-maven-plugin</artifactId>
- <version>${spring-boot.version}</version>
- <executions>
- <execution>
- <goals>
- <goal>repackage</goal>
- </goals>
- </execution>
- </executions>
- </plugin>
- </plugins>
- </build>
-
-
- </project>
我们的项目结构如图:

配置文件:XxlJobConfig,完全是复制 XXL-JOB 的配置文件,完整代码:
- package com.study.config;
-
- import com.xxl.job.core.executor.impl.XxlJobSpringExecutor;
- import org.slf4j.Logger;
- import org.slf4j.LoggerFactory;
- import org.springframework.beans.factory.annotation.Value;
- import org.springframework.context.annotation.Bean;
- import org.springframework.context.annotation.Configuration;
-
- /**
- * xxl-job config
- *
- * @author xuxueli 2017-04-28
- */
- @Configuration
- public class XxlJobConfig {
- private Logger logger = LoggerFactory.getLogger(XxlJobConfig.class);
-
- @Value("${xxl.job.admin.addresses}")
- private String adminAddresses;
-
- @Value("${xxl.job.accessToken}")
- private String accessToken;
-
- @Value("${xxl.job.executor.appname}")
- private String appname;
-
- @Value("${xxl.job.executor.address}")
- private String address;
-
- @Value("${xxl.job.executor.ip}")
- private String ip;
-
- @Value("${xxl.job.executor.port}")
- private int port;
-
- @Value("${xxl.job.executor.logpath}")
- private String logPath;
-
- @Value("${xxl.job.executor.logretentiondays}")
- private int logRetentionDays;
-
-
- @Bean
- public XxlJobSpringExecutor xxlJobExecutor() {
- logger.info(">>>>>>>>>>> xxl-job config init.");
- XxlJobSpringExecutor xxlJobSpringExecutor = new XxlJobSpringExecutor();
- xxlJobSpringExecutor.setAdminAddresses(adminAddresses);
- xxlJobSpringExecutor.setAppname(appname);
- xxlJobSpringExecutor.setAddress(address);
- xxlJobSpringExecutor.setIp(ip);
- xxlJobSpringExecutor.setPort(port);
- xxlJobSpringExecutor.setAccessToken(accessToken);
- xxlJobSpringExecutor.setLogPath(logPath);
- xxlJobSpringExecutor.setLogRetentionDays(logRetentionDays);
-
- return xxlJobSpringExecutor;
- }
-
- }
JobController 代码如下(只是为了验证我们的微服务是否启动成功):
- package com.study.controller;
-
- import org.springframework.web.bind.annotation.RequestMapping;
- import org.springframework.web.bind.annotation.RestController;
-
- /**
- * @author biandan
- * @description
- * @signature 让天下没有难写的代码
- * @create 2021-05-26 下午 5:27
- */
- @RestController
- public class JobController {
-
- @RequestMapping(value = "/index")
- public String test() {
- return "Welcome! 如果看到此信息,说明服务启动成功!";
- }
-
- }
任务类:MyJob,代码如下:
- package com.study.job;
-
- import com.xxl.job.core.context.XxlJobHelper;
- import com.xxl.job.core.handler.annotation.XxlJob;
- import org.springframework.beans.factory.annotation.Value;
- import org.springframework.stereotype.Component;
-
- import java.text.SimpleDateFormat;
- import java.util.Date;
-
- /**
- * @author biandan
- * @description
- * @signature 让天下没有难写的代码
- * @create 2021-05-26 下午 5:33
- */
- @Component
- public class MyJob{
-
- @Value("${xxl.job.executor.port}")
- private int port;
-
- SimpleDateFormat SDF = new SimpleDateFormat("yyyy-MM-dd HH:mm:ss");
-
- /**
- * 我的个人测试 handler
- *
- * @throws Exception
- */
- @XxlJob("jobStudyHandler")
- public void jobStudyHandler(){
- String param = XxlJobHelper.getJobParam();
- String msg = "执行器端口号:" + port + ",当前时间:" + SDF.format(new Date()) + ",获取到的参数:" + param;
- XxlJobHelper.log(msg);
- System.out.println(msg);
- }
-
- }
说明:获取参数使用 XxlJobHelper.getJobParam() 方法获取。
启动类:StudyJobApplication
- package com.study;
-
- import org.springframework.boot.SpringApplication;
- import org.springframework.boot.autoconfigure.SpringBootApplication;
-
- /**
- * @author biandan
- * @description
- * @signature 让天下没有难写的代码
- * @create 2021-05-26 下午 5:25
- */
- @SpringBootApplication
- public class StudyJobApplication {
-
- public static void main(String[] args) {
- SpringApplication.run(StudyJobApplication.class,args);
- }
-
- }
配置信息 application.properties:
- # web port
- server.port=9001
- # no web
- #spring.main.web-environment=false
-
- # log config
- logging.config=classpath:logback.xml
-
-
- ### xxl-job admin address list, such as "http://address" or "http://address01,http://address02"
- # 调度中心地址
- xxl.job.admin.addresses=http://127.0.0.1:8080/xxl-job-admin
-
- ### xxl-job, access token
- xxl.job.accessToken=
-
- ### xxl-job executor appname
- # 执行器应用的名字
- # xxl.job.executor.appname=xxl-job-executor-sample
- xxl.job.executor.appname=job-study-appname
- ### xxl-job executor registry-address: default use address to registry , otherwise use ip:port if address is null
- xxl.job.executor.address=
- ### xxl-job executor server-info
- xxl.job.executor.ip=
- xxl.job.executor.port=9090
- ### xxl-job executor log-path
- xxl.job.executor.logpath=/data/applogs/xxl-job/jobhandler
- ### xxl-job executor log-retention-days
- xxl.job.executor.logretentiondays=30
logback.xml 文件:
- <?xml version="1.0" encoding="UTF-8"?>
- <configuration debug="false" scan="true" scanPeriod="1 seconds">
-
- <contextName>logback</contextName>
- <property name="log.path" value="/data/applogs/xxl-job/xxl-job-executor-sample-springboot.log"/>
-
- <appender name="console" class="ch.qos.logback.core.ConsoleAppender">
- <encoder>
- <pattern>%d{HH:mm:ss.SSS} %contextName [%thread] %-5level %logger{36} - %msg%n</pattern>
- </encoder>
- </appender>
-
- <appender name="file" class="ch.qos.logback.core.rolling.RollingFileAppender">
- <file>${log.path}</file>
- <rollingPolicy class="ch.qos.logback.core.rolling.TimeBasedRollingPolicy">
- <fileNamePattern>${log.path}.%d{yyyy-MM-dd}.zip</fileNamePattern>
- </rollingPolicy>
- <encoder>
- <pattern>%date %level [%thread] %logger{36} [%file : %line] %msg%n
- </pattern>
- </encoder>
- </appender>
-
- <root level="info">
- <appender-ref ref="console"/>
- <appender-ref ref="file"/>
- </root>
-
- </configuration>
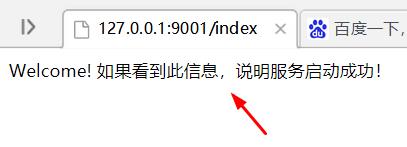
OK,我们启动我们的微服务,访问地址:http://127.0.0.1:9001/index


然后我们启动调度中心微服务,并配置我们的执行器信息、任务信息。
1、启动调度中心微服务

2、配置执行器信息

3、创建任务

4、启动任务,可以看到执行器的微服务不断的打印如下信息:(拿到了参数,我们可以根据一定的规则转成我们想要的格式,比如 JSON 格式、数组格式等)

OK,SpringBoot 整合 XXL-JOB 搞定。我们可以移植到我们的实际项目中。
本篇博客源代码:https://pan.baidu.com/s/1SFvX76UQ3JVoQtg6oCi5Sw 提取码:edk3
原文链接:https://blog.csdn.net/BiandanLoveyou/article/details/117294100
所属网站分类: 技术文章 > 博客
作者:我很伤感
链接:http://www.javaheidong.com/blog/article/207441/693b93d2e0c3793b242f/
来源:java黑洞网
任何形式的转载都请注明出处,如有侵权 一经发现 必将追究其法律责任
昵称:
评论内容:(最多支持255个字符)
---无人问津也好,技不如人也罢,你都要试着安静下来,去做自己该做的事,而不是让内心的烦躁、焦虑,坏掉你本来就不多的热情和定力