Spring Security学习笔记(二)—— 实现图像验证码登录
发布于2021-05-29 22:20 阅读(1270) 评论(0) 点赞(25) 收藏(0)
1 使用过滤器实现图像验证码
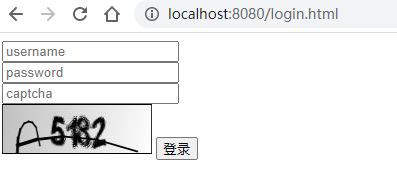
效果图如下:

1.1 配置图形验证码API
毋庸置疑,想要实现图像验证码校验,必须现有图像校验码,这里使用开源的验证码组件即可,例如kaptcha(请勿用于生产)
<dependency>
  <groupId>com.github.penggle</groupId>
  <artifactId>kaptcha</artifactId>
  <version>2.3.2</version>
</dependency>
首先配置一个kaptcha的实例。
@Configuration
public class CaptchaConfig {

    @Bean
    public Producer captcha(){
        Properties properties = new Properties();
        properties.setProperty("kaptcha.images.width", "150");
        properties.setProperty("kaptcha.images.height", "50");
        properties.setProperty("kaptcha.textproducer.char.string", "0123456789");
        properties.setProperty("kaptcha.textproducer.char.length", "4");

        Config config = new Config(properties);
        DefaultKaptcha defaultKaptcha = new DefaultKaptcha();
        defaultKaptcha.setConfig(config);
        return defaultKaptcha;
    }
}
接着创建一个CaptchaController,用于获取图像验证码
@Controller
public class CaptchaController {

    @Autowired
    private Producer captchaProducer;

    @GetMapping("/captcha.jpg")
    public void getCaptcha(HttpServletRequest request, HttpServletResponse response) throws IOException {
        response.setContentType("image/jpeg");
        String capText = captchaProducer.createText();
        request.getSession().setAttribute("captcha", capText);  // 将文本放入到本次会话当中
        BufferedImage image = captchaProducer.createImage(capText);
        ServletOutputStream outputStream = response.getOutputStream();
        ImageIO.write(image, "jpg", outputStream);
        try {
            outputStream.flush();
        }finally {
            outputStream.flush();
        }
    }
}
接下来就可以访问http://localhost:8080/captcha.jpg,就可以查看图像验证码。

1.2 自定义图像验证码过滤器
有了图像验证码的API以后就可以自定义验证码校验过滤器了,虽然SpringSecurity的过滤器链对过滤器没有要求,但是在Spring体系当中,推荐使用OncePerRequestFilter,他可以确保一次请求只会通过一次该过滤器。
public class VerificationCodeException extends AuthenticationException {
    public VerificationCodeException() {
        super("图形验证码错误");
    }
}
自定义一个验证码校验失败的异常
public class VerificationCodeFilter extends OncePerRequestFilter {

    @Override
    protected void doFilterInternal(HttpServletRequest request, HttpServletResponse response, FilterChain chain) throws IOException, ServletException {
        if ("/login".equals(request.getRequestURI())) { // 非登录请求不去校验验证码
            // 验证验证码的正确与否
            verificationCode(request);
        }
        chain.doFilter(request, response);
    }

    private void verificationCode(HttpServletRequest request) throws VerificationCodeException {
        // 在form表单中获取对应输入的值
        String captcha = request.getParameter("captcha");
        HttpSession session = request.getSession();
        String saveCode = (String) session.getAttribute("captcha");
        if (StringUtils.hasLength(saveCode)) {
            session.removeAttribute("captcha");
        }
        if (!StringUtils.hasLength(captcha) || !StringUtils.hasLength(saveCode) || !captcha.equals(saveCode)) {
            throw new VerificationCodeException();
        }
    }
}
1.3 Spring Security配置
@Configuration
public class MyWebSecurityConfig extends WebSecurityConfigurerAdapter {

    @Override
    protected void configure(HttpSecurity http) throws Exception {

        http.formLogin().loginPage("/login.html").loginProcessingUrl("/login").permitAll()
                .and().authorizeRequests()
                .antMatchers("/captcha.jpg").permitAll()
                .anyRequest().authenticated()
                .and().csrf().disable();
        http.addFilterBefore(new VerificationCodeFilter(), UsernamePasswordAuthenticationFilter.class);
    }
}
在校验用户名和密码之前先进行校验验证码,验证码通过以后在进行后续的校验。
1.4 实验
<!DOCTYPE html>
<html lang="en">
<head>
    <meta charset="UTF-8">
    <title>Login</title>
</head>
<body>
<form action="/login" method="post">
    <input type="text" name="username" placeholder="username">
    <input type="password" name="password" placeholder="password">
    <input type="text" name="captcha" placeholder="captcha">
    <img src="/captcha.jpg" alt="captcha" height="50px" width="150px">
    <input type="submit" value="登录">
</form>
</body>
</html>
2 自定义认证实现图像验证码
2.1 认识AuthenticationProvider
前面使用过滤器的方式实现了带图像验证码的验证功能,属于Servlet层面,简单容易理解,其实SpringSecurity还有一种更加优雅的方式实现,即自定义人认证。
系统所面对的用户,在SpringSecurity中视为主体(principal),主题包含了所有经过检验获得系统访问权限的用户,Spring Security通过一层包装定义为一个Authentication。
public interface Authentication extends Principal, Serializable {

    // 获取主体的权限名称
	Collection<? extends GrantedAuthority> getAuthorities();

    // 获取主体的凭据,通常为用户密码
	Object getCredentials();

    // 获取主体携带的详细信息
	Object getDetails();

    // 获取主体,通常为用户名
	Object getPrincipal();

    // 主题是否验证成功
	boolean isAuthenticated();

	void setAuthenticated(boolean isAuthenticated) throws IllegalArgumentException;
}
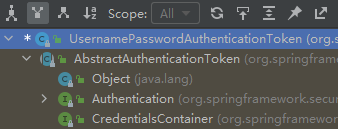
在前面的用户登录模型中,使用的都是UsernamePasswordAuthenticationToken这个也是实现了Authentication。每一个登陆的用户都被封装成UsernamePasswordAuthenticationToken,从而在SpringSecurity的各个Authentication中流动。
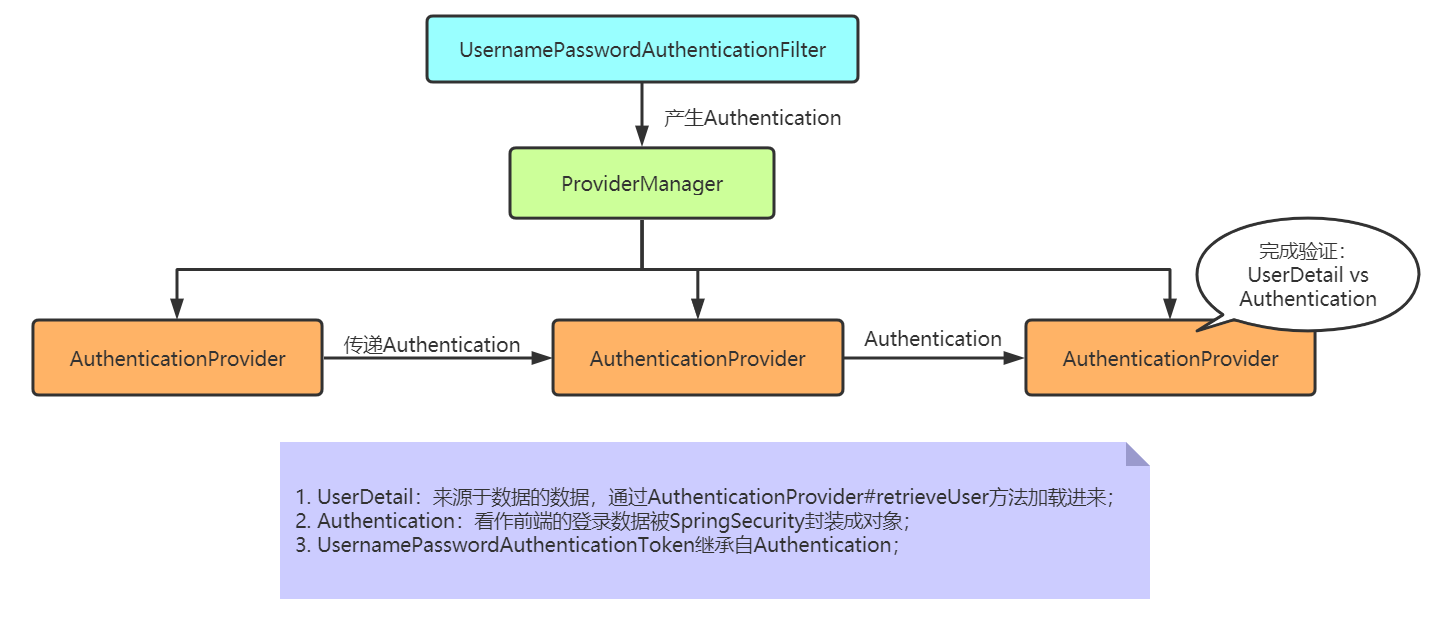
可以把Authentication看成前端封装的用户对象,而UserDetail看成后台存储的实际对象,Provider的工作就是对比两者,相同则认为认证通过。

一个完整的认证可以包含多个AuthenticationProvider,一般由ProviderManager管理。
public class ProviderManager implements AuthenticationManager, MessageSourceAware, InitializingBean {
    // 验证
	@Override
	public Authentication authenticate(Authentication authentication) throws AuthenticationException {
		Class<? extends Authentication> toTest = authentication.getClass();

        // 验证迭代每一个Provider,直到有一个验证通过,即可跳出
		for (AuthenticationProvider provider : getProviders()) {
			if (!provider.supports(toTest)) {
				continue;
			}
			......
		}
		......
	}
}
2.2 自定义AuthenticationProvider
Spring Security 并没有糅合所有的认证过程,而是提供了一个抽象的AuthenticationProvider
public abstract class AbstractUserDetailsAuthenticationProvider
		implements AuthenticationProvider, InitializingBean, MessageSourceAware {

    // 附加检索过程
    protected abstract void additionalAuthenticationChecks(UserDetails userDetails, UsernamePasswordAuthenticationToken authentication) throws AuthenticationException;

    // 检索用户
    protected abstract UserDetails retrieveUser(String username, UsernamePasswordAuthenticationToken authentication) throws AuthenticationException;

    // 认证过程
    @Override
	public Authentication authenticate(Authentication authentication) throws AuthenticationException {

		String username = determineUsername(authentication);
		boolean cacheWasUsed = true;
		UserDetails user = this.userCache.getUserFromCache(username);
		if (user == null) {
			cacheWasUsed = false;
			try {
                // 先检索用户
				user = retrieveUser(username, (UsernamePasswordAuthenticationToken) authentication);
			}
			catch (UsernameNotFoundException ex) {
				this.logger.debug("Failed to find user '" + username + "'");
				if (!this.hideUserNotFoundExceptions) {
					throw ex;
				}
				throw new BadCredentialsException(this.messages
						.getMessage("AbstractUserDetailsAuthenticationProvider.badCredentials", "Bad credentials"));
			}
			Assert.notNull(user, "retrieveUser returned null - a violation of the interface contract");
		}
		try {
            // 检查账户是否可用
			this.preAuthenticationChecks.check(user);
            // 附加认证
			additionalAuthenticationChecks(user, (UsernamePasswordAuthenticationToken) authentication);
		}
		catch (AuthenticationException ex) {
			if (!cacheWasUsed) {
				throw ex;
			}
			// There was a problem, so try again after checking
			// we're using latest data (i.e. not from the cache)
			cacheWasUsed = false;
			user = retrieveUser(username, (UsernamePasswordAuthenticationToken) authentication);
			this.preAuthenticationChecks.check(user);
			additionalAuthenticationChecks(user, (UsernamePasswordAuthenticationToken) authentication);
		}
        // 检查密码是否过期
		this.postAuthenticationChecks.check(user);
		if (!cacheWasUsed) {
			this.userCache.putUserInCache(user);
		}
		Object principalToReturn = user;
		if (this.forcePrincipalAsString) {
			principalToReturn = user.getUsername();
		}
        // 返回一个认证通过的Autenticaton
		return createSuccessAuthentication(principalToReturn, authentication, user);
	}
}
在
AbstractUserDetailsAuthenticationProvider实现了基本的认证流程,开发者只需要继承该抽象类,并实现其中的两个抽象方法(additionalAuthenticationChecks、retrieveUser),即可以完成自定义Provider的功能。
我们观察AbstractUserDetailsAuthenticationProvider的继承树可以发现,DaoAuthenticationProvider实现了该抽象类。

public class DaoAuthenticationProvider extends AbstractUserDetailsAuthenticationProvider {

    // 进行密码的验证
	@Override
	protected void additionalAuthenticationChecks(UserDetails userDetails,
			UsernamePasswordAuthenticationToken authentication) throws AuthenticationException {
		if (authentication.getCredentials() == null) {
			this.logger.debug("Failed to authenticate since no credentials provided");
			throw new BadCredentialsException(this.messages
					.getMessage("AbstractUserDetailsAuthenticationProvider.badCredentials", "Bad credentials"));
		}
		String presentedPassword = authentication.getCredentials().toString();
		if (!this.passwordEncoder.matches(presentedPassword, userDetails.getPassword())) {
			this.logger.debug("Failed to authenticate since password does not match stored value");
			throw new BadCredentialsException(this.messages
					.getMessage("AbstractUserDetailsAuthenticationProvider.badCredentials", "Bad credentials"));
		}
	}

    // 从数据库中获取用户对象
	@Override
	protected final UserDetails retrieveUser(String username, UsernamePasswordAuthenticationToken authentication)
			throws AuthenticationException {
		prepareTimingAttackProtection();
		try {
            // 获取数据库中真实的用户对象
			UserDetails loadedUser = this.getUserDetailsService().loadUserByUsername(username);
			if (loadedUser == null) {
				throw new InternalAuthenticationServiceException(
						"UserDetailsService returned null, which is an interface contract violation");
			}
			return loadedUser;
		}
		.....
	}
}
由于本次登录依然包含了密码登录,所以我们这里直接继承DaoAuthenticationProvider,并重写其中的一个附加认证(additionalAuthenticationChecks)的方法。
@Service
public class MyAuthenticationProvider extends DaoAuthenticationProvider {

    public MyAuthenticationProvider(UserDetailsService userDetailsService) {
        this.setPasswordEncoder(new BCryptPasswordEncoder());
        this.setUserDetailsService(userDetailsService);
    }

    @Override
    protected void additionalAuthenticationChecks(UserDetails userDetails, UsernamePasswordAuthenticationToken authentication) throws AuthenticationException {
        // 实现图像验证码的操作

        // 调用父类完成密码验证的操作
        super.additionalAuthenticationChecks(userDetails, authentication);
    }
}
这是有一个问题就是,我们的真是验证码的值存储在了Session当中,这里并没有传入Request对象,所以没有办法获取真实的验证码。因为传入了UsernamePasswordAuthenticationToken,我们在前面知道它实现了Authentication接口,里面包含除了用户名和密码等信息外,还有一个getDetails字段。也就是实现了携带账号信息以外的东西。
public interface Authentication extends Principal, Serializable {
    ...
    // 获取主体携带的详细信息
	Object getDetails();
}
一个完整的认证流程包含多个AuthenticationProvider,这些AuthenticationProvider都是由AuthenticationManager管理,而ProviderManager是由UsernamePasswordAuthenticationFilter所调用,也就是AuthenticationProvider所包含的Authentication都来源于UsernamePasswordAuthenticationFilter。
public class UsernamePasswordAuthenticationFilter extends AbstractAuthenticationProcessingFilter {

    public Authentication attemptAuthentication(HttpServletRequest request, HttpServletResponse response) throws AuthenticationException {
        if (this.postOnly && !request.getMethod().equals("POST")) {
            throw new AuthenticationServiceException("Authentication method not supported: " + request.getMethod());
        } else {
            String username = this.obtainUsername(request);
            username = username != null ? username : "";
            username = username.trim();
            String password = this.obtainPassword(request);
            password = password != null ? password : "";
            // 生成一个基本的Authentication
            UsernamePasswordAuthenticationToken authRequest = new UsernamePasswordAuthenticationToken(username, password);
            // 为该Authentication设置详细信息
            this.setDetails(request, authRequest);
            // 调用Manager完成认证
            return this.getAuthenticationManager().authenticate(authRequest);
        }
    }
    protected void setDetails(HttpServletRequest request, UsernamePasswordAuthenticationToken authRequest) {
        authRequest.setDetails(this.authenticationDetailsSource.buildDetails(request));
    }
}
这个通过标准的接口AuthenticationDetailsSource进行构建的,这意味着是一个允许定制的特性。
public interface AuthenticationDetailsSource<C, T> {
	T buildDetails(C context);
}
UsernamePasswordAuthenticationFilter中使用的是WebAuthenticationDetailsSource进行构建,携带的是用户的remoteAddress和sessionId。
public class WebAuthenticationDetailsSource implements AuthenticationDetailsSource<HttpServletRequest, WebAuthenticationDetails> {
    public WebAuthenticationDetailsSource() {
    }

    public WebAuthenticationDetails buildDetails(HttpServletRequest context) {
        return new WebAuthenticationDetails(context);
    }
}

public class WebAuthenticationDetails implements Serializable {
    private static final long serialVersionUID = 540L;
    private final String remoteAddress;
    private final String sessionId;
    .....
}
2.3 自定义WebAuthenticationDetails
public class MyWebAuthenticationDetails extends WebAuthenticationDetails {

    // 增加一个字段,验证成功则返回true
    private boolean imageCodeIsRight;

    public MyWebAuthenticationDetails(HttpServletRequest request) {
        super(request);
        String captcha = request.getParameter("captcha");
        HttpSession session = request.getSession();
        String saveCode = (String) session.getAttribute("captcha");
        if (StringUtils.hasLength(saveCode)) {
            session.removeAttribute("captcha");
        }
        if (StringUtils.hasLength(captcha) && StringUtils.hasLength(saveCode) && captcha.equals(saveCode)) {
            this.imageCodeIsRight = true;
        }
    }

    public boolean isImageCodeIsRight() {
        return imageCodeIsRight;
    }
}
2.4 自定义AuthenticationDetailsSource
@Configuration
public class MyAuthenticationDetailsSource implements AuthenticationDetailsSource<HttpServletRequest, WebAuthenticationDetails> {
    @Override
    public WebAuthenticationDetails buildDetails(HttpServletRequest context) {
        return new MyWebAuthenticationDetails(context);
    }
}
2.5 完善自定义AuthenticationProvider
@Service
public class MyAuthenticationProvider extends DaoAuthenticationProvider {

    public MyAuthenticationProvider(UserDetailsService userDetailsService) {
        this.setPasswordEncoder(new BCryptPasswordEncoder());
        this.setUserDetailsService(userDetailsService);
    }

    @Override
    protected void additionalAuthenticationChecks(UserDetails userDetails, UsernamePasswordAuthenticationToken authentication) throws AuthenticationException {
        // 实现图像验证码的操作
        MyWebAuthenticationDetails details = (MyWebAuthenticationDetails)authentication.getDetails();
        if (!details.isImageCodeIsRight()) {
            throw new VerificationCodeException();
        }
        // 调用父类完成密码验证的操作
        super.additionalAuthenticationChecks(userDetails, authentication);
    }
}
2.6 SpringSecurity配置
@EnableWebSecurity
public class MyWebSecurityConfig extends WebSecurityConfigurerAdapter {

    @Resource
    private AuthenticationDetailsSource<HttpServletRequest, WebAuthenticationDetails> myWebAuthenticationDetailsSource;

    @Resource
    private AuthenticationProvider authenticationProvider;

    @Override
    protected void configure(AuthenticationManagerBuilder auth) throws Exception {
        auth.authenticationProvider(authenticationProvider);
    }

    @Override
    protected void configure(HttpSecurity http) throws Exception {

        http.formLogin().authenticationDetailsSource(myWebAuthenticationDetailsSource)
            .loginPage("/login.html").loginProcessingUrl("/login").permitAll()
                .and().authorizeRequests()
                .antMatchers("/captcha.jpg").permitAll()
                .anyRequest().authenticated()
                .and().csrf().disable();
    }
}
总结

所属网站分类: 技术文章 > 博客
作者:码神
链接:http://www.javaheidong.com/blog/article/207795/8caddfd0727dccfc1c99/
来源:java黑洞网
任何形式的转载都请注明出处,如有侵权 一经发现 必将追究其法律责任
昵称:
评论内容:(最多支持255个字符)
---无人问津也好,技不如人也罢,你都要试着安静下来,去做自己该做的事,而不是让内心的烦躁、焦虑,坏掉你本来就不多的热情和定力